
You license for KVMShare Pro is also valid for the DesktopFusion edition and the other way around. You simply install the other edition on all your computers and the license stays valid.
Recommended is the use of a fake/virtual/dummy video port plug. They can be ordered very cheaply online these days, specially the HDMI and Display Port plugs only cost a couple of dollars including postage.
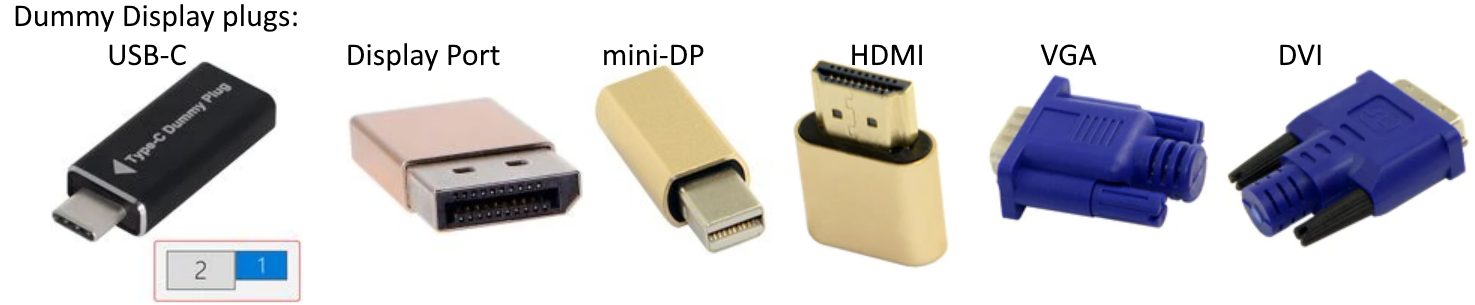
Alternative is to install a fake/virtual display driver, but this is not recommended because it will might support hardware acceleration and you will likely need to enable legacy video mode to make it work which will make your windows look like windows 7 style. But for testing this program it might be useful. More information about this at the bottom of this page.

Buy now KVMShare Pro or DesktopFusion
Connecting 2 or 3 computers.
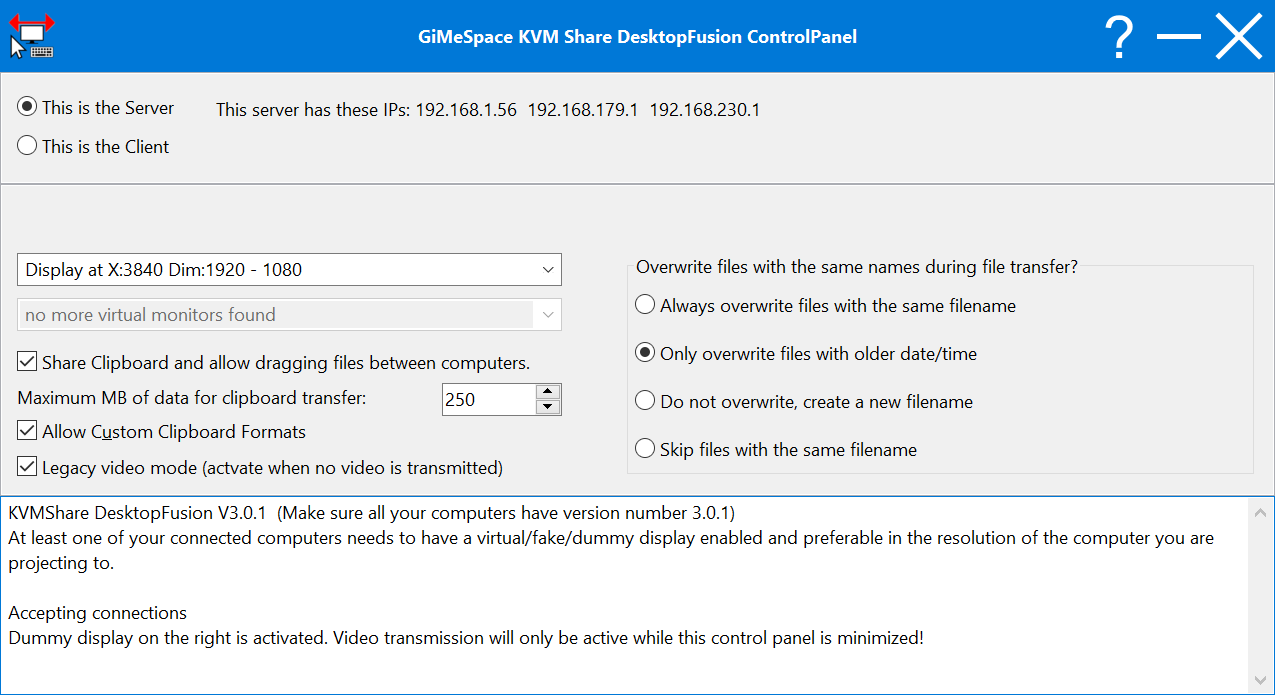
First you need to assign a server role to one computer and a client role to the others. The server is typically the computer which is in the middle because only the server can have 2 connections at the same time.
The server computer will display one or more IP addresses. Typically the first address is the active Wi-Fi or Ethernet connection. Enter this address on the client computer and press connect. On the server there will appear a confirmation box asking if it is ok to connect. When you allow the connection the client computer will be remembered on the server so next time you will not need to reconfirm the connection. You can also select auto connect so next time you start up the connection will be made directly.
Setting up the displays.
First you have to plugin the dummy video plug. Up to 2 are supported on the server computer and only 1 on client computers.
You will need to open the display settings. It is important to select the display resolution of the dummy display as close as possible to the resolution of the display of the computer you are projecting to. If the resolution is slightly different you might notice some mouse jumps when crossing the displays. The Refresh rate is best to keep the same as the primary display. You have to tell windows to extend you desktop across all displays. Also you need to position the screen to the left or right according to where this computer is located.
Now in the DesktopFusion control panel you have to select the dummy display to activate it. It is important to know that the projection of windows to this dummy display will only start working when the DesktopFusion control panel is minimized!
Also on the client computer you need to specify on which side this computer is located.
To avoid hiding the taskbar of the connected computer you need to disable the taskbar on the dummy display. In taskbar settings, turn off: 'show taskbar on all displays'
After minimizing the control panel you can start moving your mouse and windows across the other screen. You can interact between windows that are projected and native windows running on the other computer at the same time. The projected windows will always stay on top. Also projected windows will only appear if most of their surface is on the dummy display. This might be confusing if only 40% of the surface is on the dummy screen because you will not see this window on the projected display.
The refresh rate of the shared window will dynamically shift between the selected FPS and a 8x lower FPS depending on how much changes are happening. This to avoid using too much network bandwidth. In general this method of sharing windows instead of having remote displays over the network will use much less bandwidth and cpu time. The recommended FPS is around 25 which uses not too much CPU and network resources.
Please note that although it is techically possible to project one screen on the other computer while the other computer is also projecting a screen back, this double projection is going to cause trouble and is not recommended!
Each time the mouse is crossing from projected windows to native windows or back the clipboard between the computers is synchronized. To avoid accidental long clipboard transfers the maximum amount of clipboard data that can be transferred can be specified. For example if you often need to transfer 4k screenshots you will need to set this limit to 40MB or higher. The maximum clipboard limit is 250MB. Also you can allow to transfer custom clipboard formats. This is not guaranteed to work since some programs who use custom clipboard formats only accept these from their own programs even if the content is correct.
There is no limit on the amount of files you can transfer.
When you have copied files or folders in the clipboard then when you switch to a window from the other computer immediately a save dialog box will appear allowing you to select the destination folder.
This program will never delete the source files so if you intend of moving the files rather than copying them then you will have to delete them yourself after a successful copy.
Before copying you might need to select the correct action specifying what happens when there are already files with the same name in the destination folder.
Security.
You don’t need to worry that this program opens up your computer to hackers. First of all only connections can be made to your server and only from a computer that is on your local network. Second of all when a connection attempt is made it shows the IP address and computer name so you can check before allowing the connection.
Because only local connections can be made, it was decided not to include an encryption option because this would make the connection much slower. The only way to intercept your data would be if your local router/switch was hacked. In that case you have a big problem anyway. If you don't trust your router the best option is to use direct crossover ethernet cables. This is also the fastest option. Gigabit usb ethernet adapters are very cheap these days and they are by far the fastest connections.
Trouble shooting.
What to do if you cannot make a connection: First of all make sure the connections of both computers are active and working and that they are connected to the same network (typically to the same router). IP addresses should also be properly assigned.
Sometimes after a network interruption it seems impossible to reconnect. But if you restart the programs on the computers it works fine again.
Also check that both incoming and outgoing connections are allowed in the windows firewall rules. This program uses port 24800 with the both TCP and UDP protocol.
If you want to enjoy even higher data transfer rates you can try connecting the 2 computers with a crossover Ethernet cable. Most modern Ethernet adapters recognize when an Ethernet cable is directly connecting 2 computers and will configure the IP addresses automatically. If this doesn’t happen you might have to specify them manually by making sure the first 3 numbers of the address are the same.
You can also use a typical usb 2 or usb 3 KM data link cable by activating the USB Ethernet device in the device manager. Enable the device that is called “OTI”. And again check that the IP addresses on both computers are correct.
Known issues.
Some parts of Windows that run with admin rights like the taskmanager, setup programs and the UAC screens ban keyboard and mouse emulation for security reasons. It is possible avoid this by also running KVMShare as Administrator.
To always run as Administrator follow these steps:
Go to the \Program files (x86)\GiMeSpace KVMShare\ folder and right click on KVMShare.exe to select "Properties"
Go to the "Compatibility" tab and click "Change settings for all users"
Check the "Run this program as an administrator" checkbox and then click OK twice to close program's properties.
Now this program will always run in Administrator mode and will be able to emulate mouse and keyboard input in the taskmanager and UAC screens. You will need to do this on each computer where remote control is required.
There are a few ways to avoid the UAC screen when running this program as administrator, search on internet and pick your favourite one.
Download now KVM Share DesktopFusion version 3.1.1 and try for maximum 30 days for free without paying:
Buy now KVM Share Pro / DesktopFusion
You can use these programs for 30 days for free, after that you will need to register it. You will receive a license key after making a PayPal payment to unlock 2 or 3 computers.
For suggestions, requests and custom builds contact: gimespace@gimespace.com
How to install a software virtual display driver
There are a few free drivers available. However some are not signed, so to be able to use them on a x64 windows you need to put your windows OS in driver testing mode which might require you to turn of secure boot in the UEFI bios setup.
So it is a lot more complicated and hardware acceleration is might not work for some drivers so you might have to enable legacy video mode in the control panel!
Available free drivers for Windows XP,Vista,7,8:
https://github.com/VirtualMonitor/VirtualMonitor/releases
https://github.com/fanxiushu/xdisp_virt/tree/master/driver
Available free drivers for windows 10/11:
https://github.com/itsmikethetech/Virtual-Display-Driver?tab=readme-ov-file (signed)
https://www.amyuni.com/forum/viewtopic.php?t=3030 (signed)
https://github.com/MolotovCherry/virtual-display-rs (signed)
https://github.com/fanxiushu/xdisp_virt/tree/master/indirect_display
To install non signed drivers:
After you have turned off the secure boot option in your Bios setup.
Run as admin: bcdedit.exe /set nointegritychecks on
and also: bcdedit.exe /set testsigning on
After reboot open your device manager and right click on your normal Display adapter and select: "Scan for hardware changes"
After this you select "Add legacy hardware" from the "Actions" menu.
Next you select "Install the hardware that I manually select from a list (Advanced)"
Next select "Show All Devices"
And click "Have Disk" to select the folder where you extracted your driver files (like xdisp_virt-master\indirect_display\driver\x64)
Install the found driver and ignore all the security warnings.
Now the virtual/indirect display driver shows in the device manager but probably not under the Display adapters. To solve this right click on the virtual/indirect display driver and select "update" driver.
Again go through the whole process of locating your locally saved driver files and install again. This time it should list under your display drivers and should work correctly.
For the fanxiushu driver you need to create a "indirect_display.ini" file in your windows folder (c:\windows)
At typical content of this file could look like this but adjust the resolution and refresh rate to your needs:
[monitor1]
enable= 1
capture_image=1
hide_cursor=1
res0=1920*1080, 60
[monitor_primary]
enable=1
capture_image=1
hide_cursor=1
res0=1920*1080, 60